Contents
Download and install Optifine 1.17 for Minecraft
You can ✅ download and install ✅ Optifine 1.17 mod (some call it client) greatly expand the game’s graphics options, making it more customizable and optimizable, ideal for those who have a low-resource pc (as they can put absolutely everything to the minimum and thus have better performance).
It will also allow us to put shaders in the game for a better graphical experience and let’s not forget 2 important features: zoom added and dynamic light.
Important: “make sure you have the latest version of Minecraft installed. You can do this by simply running the game from Minecraft Launcher WITHOUT MODS. If you do not have the latest version of Minecraft installed, Optifine will not be able to install”.
How to install Optifine 1.17 Mod for Minecraft?
There are 2 ways to install optifine, I will show you how to do both.It is very necessary to say that it is mandatory to download Optifine and not to use Forge.
METHOD #1 : you have only optifine but without other mods:
1- Download Optifine (link below)
2- Run the .Jar file and just click on “Install”.
3- Open minecraft and select the optifine profile you created and play!
METHOD #2 : you have optifine but with other mods:
1- Download optifine (link below)
2- Run the .Jar file and just click on “Extract”.
3- It will ask us where we want to extract it and place it on the desktop for easy use.
4- This extracted file should be placed in the “Mods” folder.
5- To get to the “mods” folder we go to the windows search engine and type “%appdata%” (which is in quotes), there we open the “.minecraft” folder and right there we will find the mods folder where we will put the file.
6- Clarify that this second way obviously requires installing forge or fabric and running our minecraft with this fabric or forge profile.
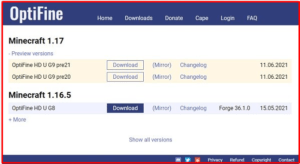
Here we click on “preview version” and download the latest version.
Configure Optifine for Minecraft 1.17
Optifine is one of the most popular mods downloaded by users, it focuses on improving the performance of the game. No matter what device and FPS we have, downloading this mod will always notice a big increase in FPS.
For example, if Minecraft runs at around 20 fps, you will easily increase at least more than 50% with this mod. This mod is also necessary to use shaders.
But you also have options to customize your experience by removing or adding different effects, textures, etc. that will make the game run at more or less fps. You also have the option to zoom in, like a scope. This helps to improve the player’s vision.
As we mentioned earlier, we can fully configure many more features than those added by default in the game.
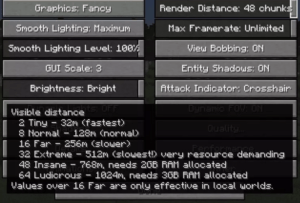
One of these is rendering, which we can set above the default version of Minecraft, allowing up to a maximum of 64 chunk (provided we have 3 GB of RAM hosted exclusively for running the game).
All of this can be set quickly and easily by pressing the “esc” button.
In the image below you can check some of the features we can customise. For example, remove the water, fire and red stone animations. Even that annoying rain will no longer appear for our world.
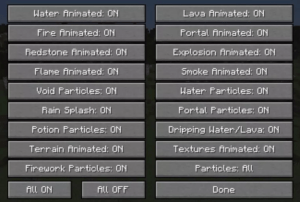
Basically, you can remove or insert any of the particles in Minecraft 1.17. If you download this mod to improve FPS, you don’t need to remove these particles to improve performance, but if you do, you will notice a huge improvement in FPS.
The following image shows the full editing editor menu, although, as we saw in the previous images, each section has different options.
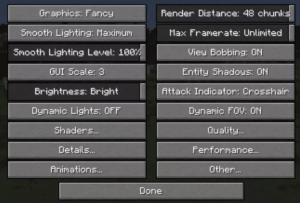
All this makes the mod very intuitive, so nobody should have problems configuring it, regardless of age or low technical knowledge. All this and much more… What are you waiting for during installation?